How to Create Users, Manage Roles and Enable Data Permissions in Garage Hive
In the Garage Hive system, the User Management page allows creation of licenced users, management of their roles, and enabling of data permissions. The only user who can create users, manage roles, and enable data permissions for users is the one who is marked as the System Administrator.
In this article
- Checking GH Entitlements Available In the System
- Adding and Removing a User Licence
- Creating a Service Advisor user
- Creating a Technician user
- Enabling and disabling a user
- Password reset for garage hive user
- Enabling Data Permissions for a User
- Add Authentication Email with Azure Active Directory (AAD)
- How to Filter Out Service Advisor Tiles For a User
Checking GH Entitlements Available In the System
To check the available and assigned GH Entitlements in your system:
-
Search for User Management in the
 icon, at the top-right corner.
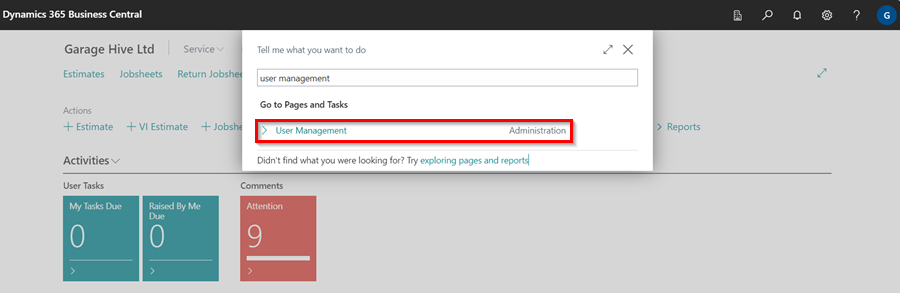
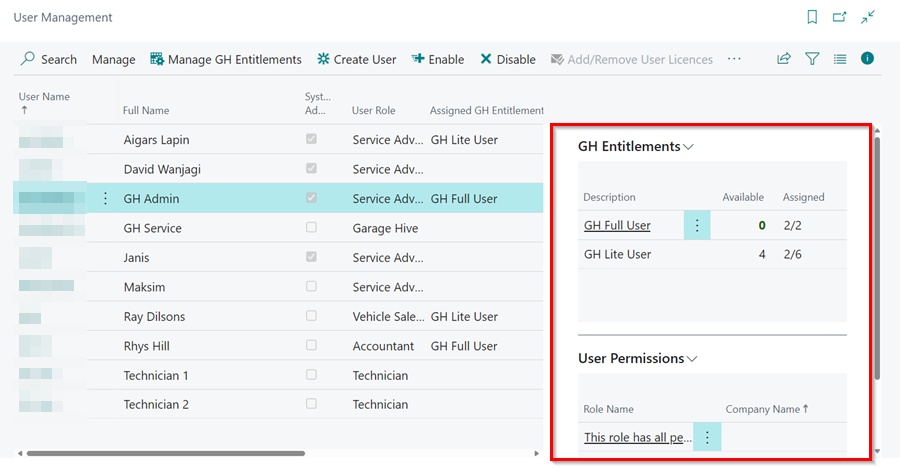
-
In the top right corner, you’ll find an information icon (ℹ️). Click on it.
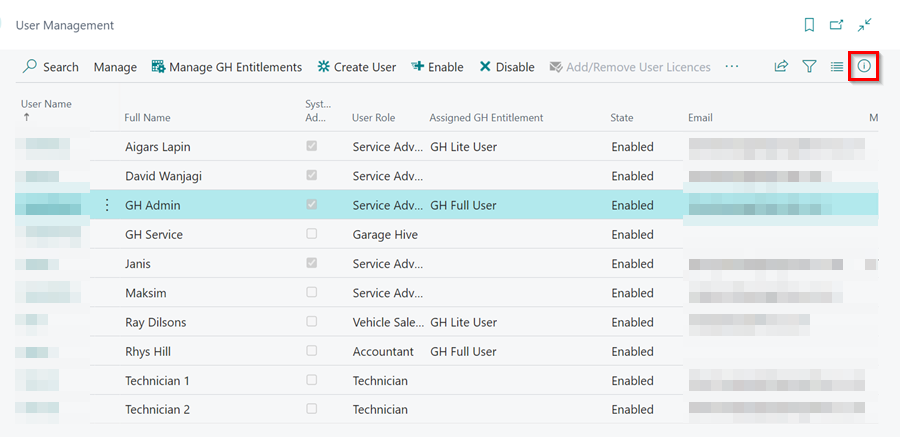
-
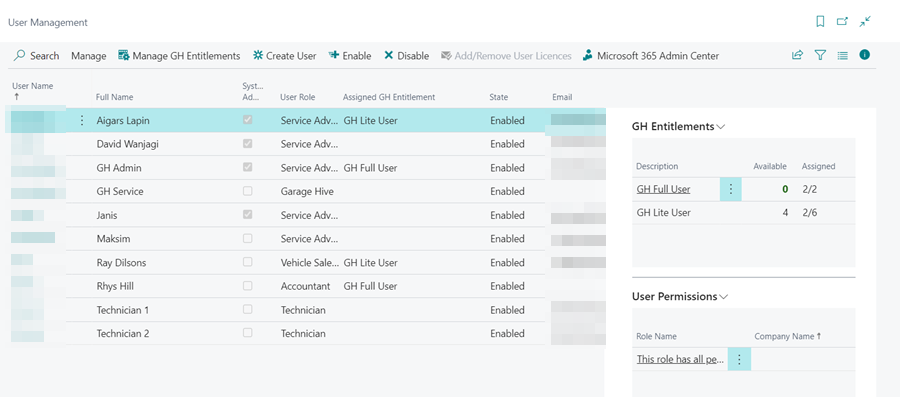
This action will open a new sidebar on the right side of the screen, where the total number of GH Entitlements currently available or assigned in your system can be viewed.
Adding and Removing a User Licence
To be able to use user accounts in the Garage Hive system, they must have a licence. The addition or removal of licences is handled by the Garage Hive support team. So, to initiate the process of adding or removing licence:
- Search for User Management in the icon, at the top-right corner.
-
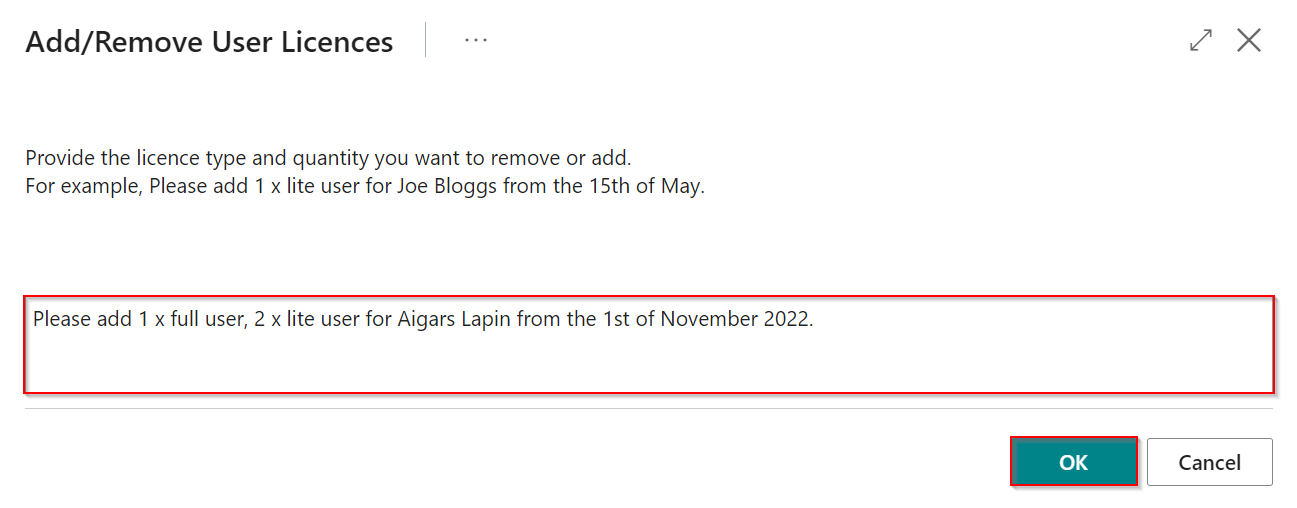
From the menu bar, select Add/Remove User Licences.
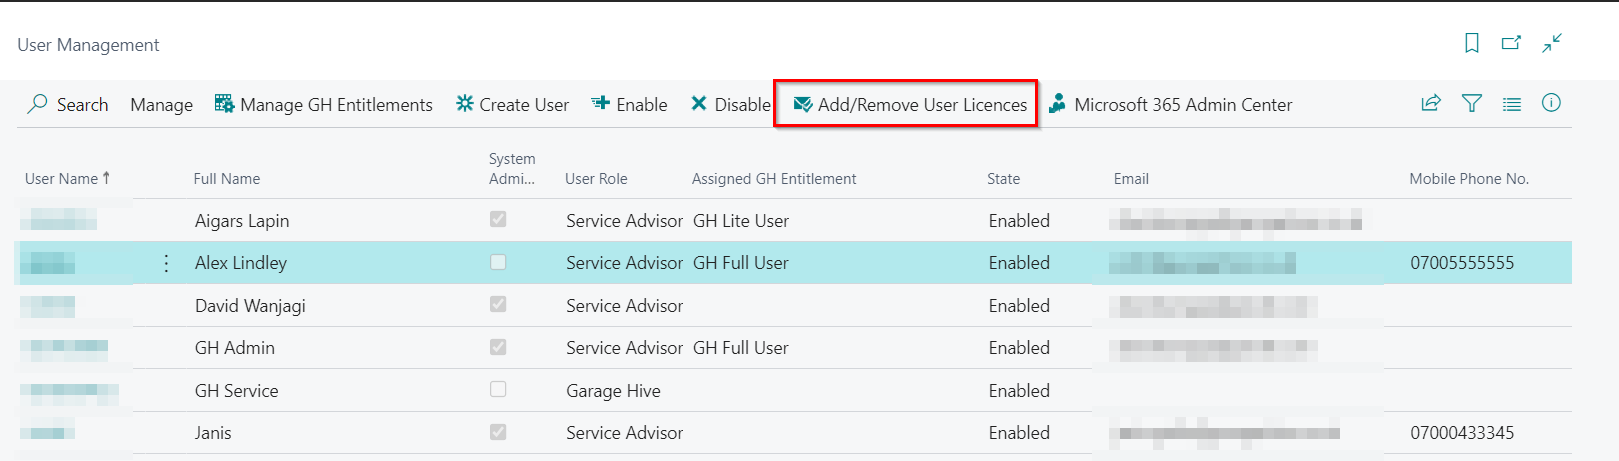
-
Enter the number of licences to be added, as shown in the image below, and then click OK.
-
You will receive a notification with the following message:
‘Your request was submitted to Garage Hive support. You should receive a confirmation email immediately. Please note that processing Microsoft licences can take up to 48 hours.’
NoteIf you did not receive the automated email confirmation, please contact the support team as they may not have received the request.
Creating a Service Advisor User
To create a Service Advisor Role:
-
Search for User Management in the
icon, at the top-right corner.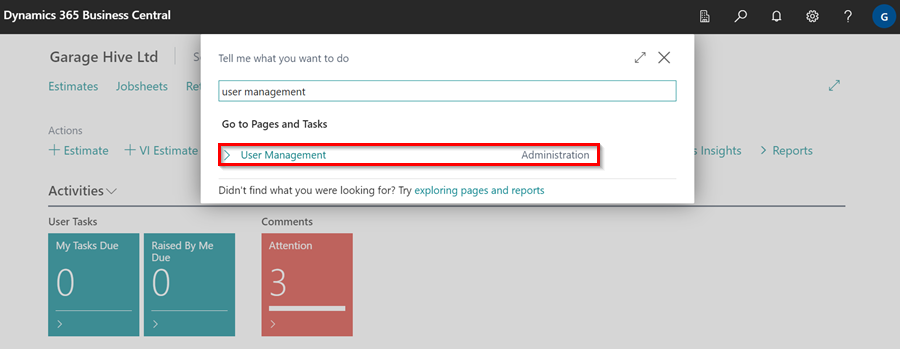
-
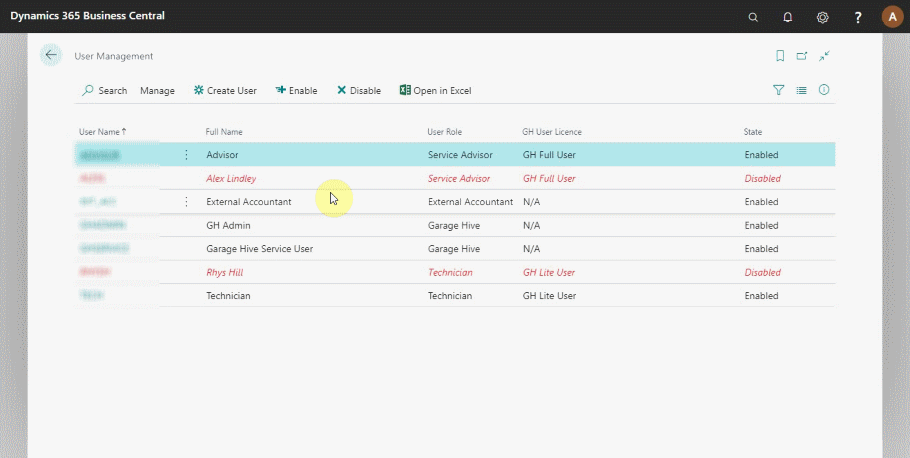
The User Management page displays all the users, their roles, statuses, and GH Entitlements assigned.
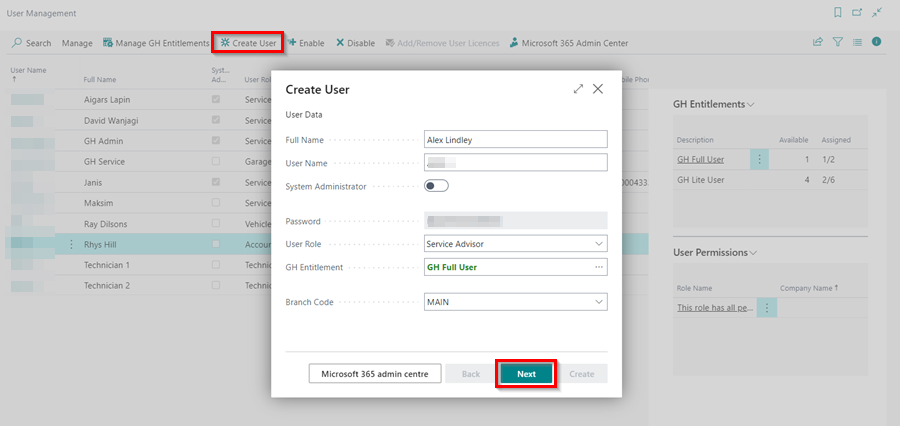
- To create a new Service Advisor user, click on Create User from the menu bar and enter the user Full Name in the pop-up window.
- The system generates a username and password for the user.
-
Select, the user Role as Service Advisor, which will have the GH Entitlement as the GH Full User. Click Next.
-
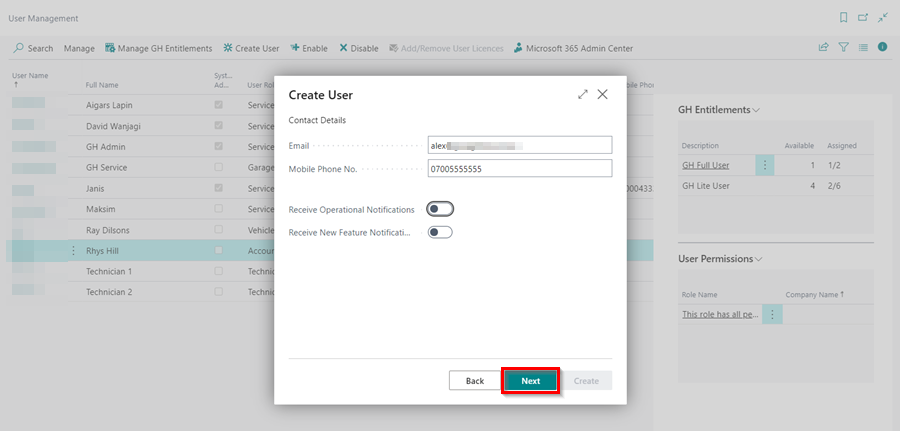
Enter the user Contact Details and notification settings for the user. Click Next.
-
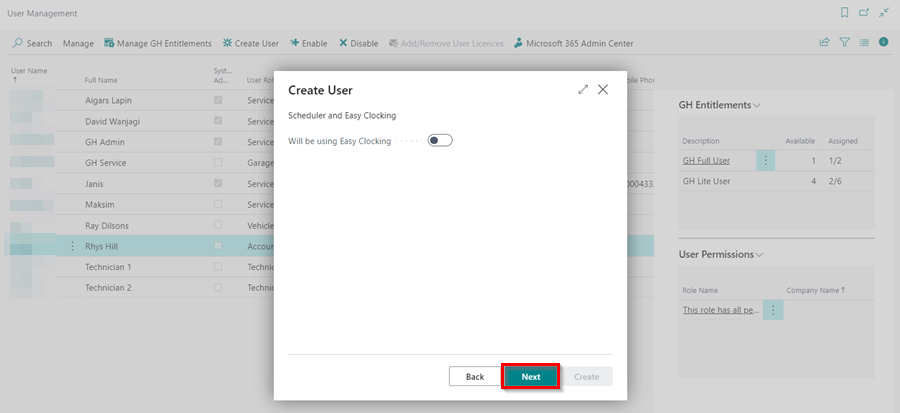
Specify the clocking preference for the user. Click Next.
-
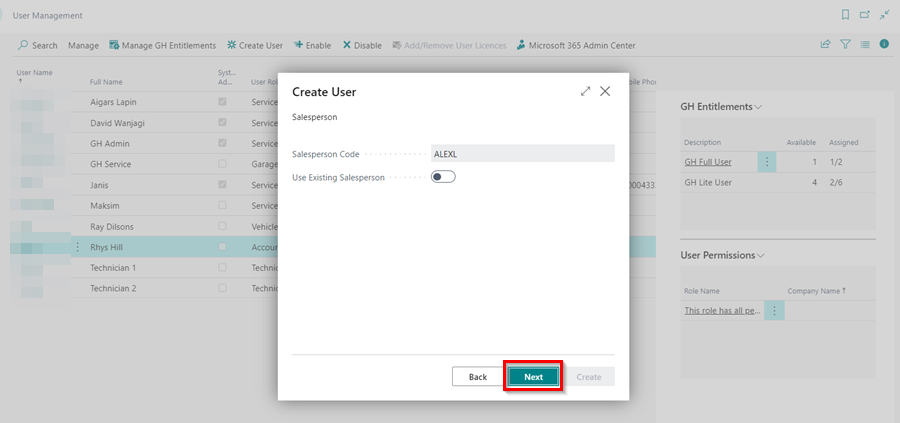
The following page allow you to add the Salesperson Code or use an existing salesperson. Click Next.
-
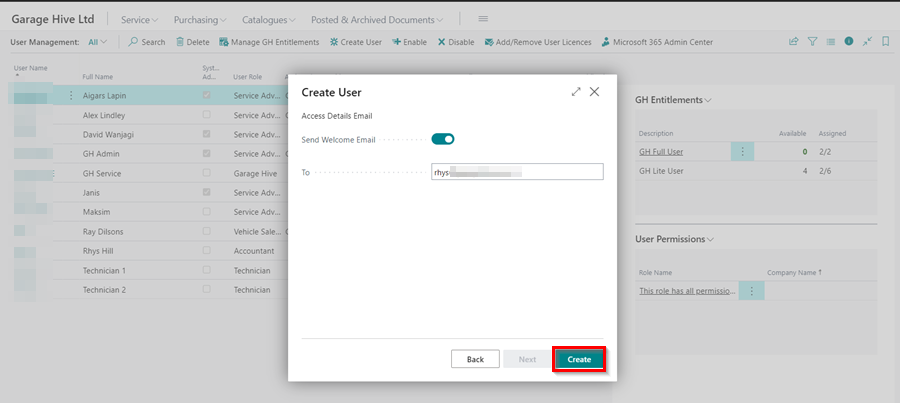
Choose whether to send a welcome email. Click Create.
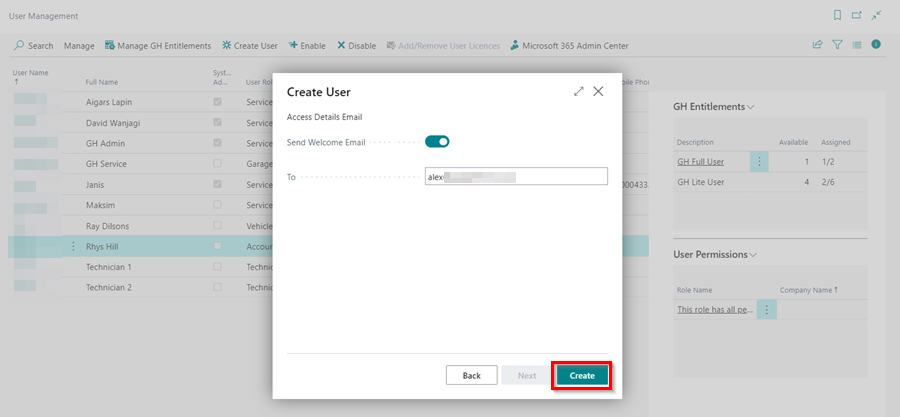
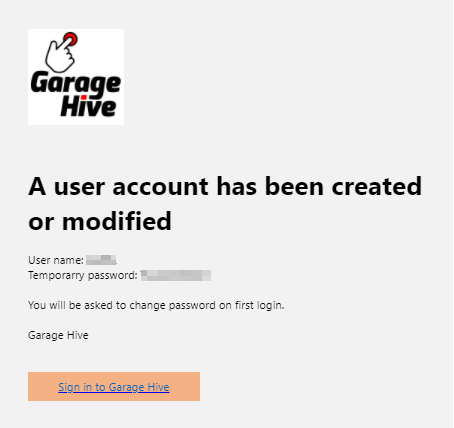
- An email is sent to the new user with the login details, and they can now sign in.
Creating a Technician User
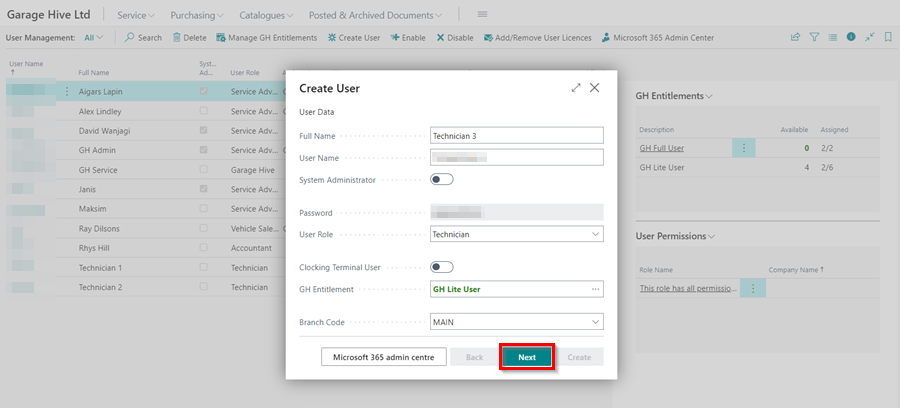
To create a Technician user:
- Click on Create from the menu bar and enter the user full name.
- The system generates a username and password for the user.
-
Select, the user Role as Technician, which will have the GH Entitlement as the GH Lite User. Click Next.
-
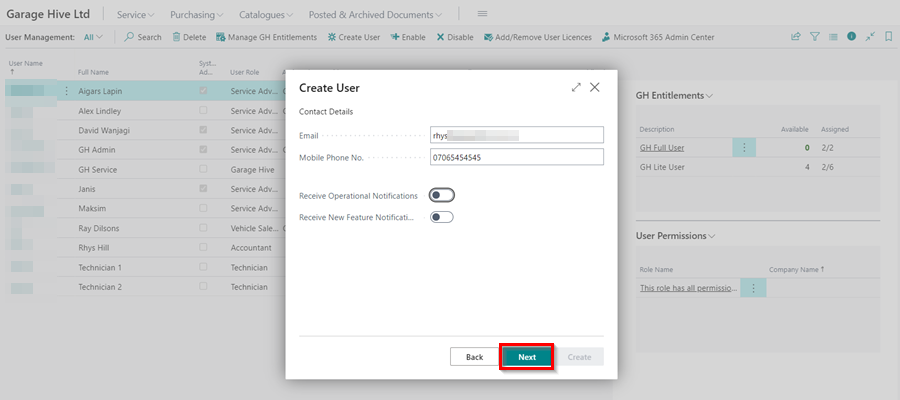
Enter the user Contact Details and notification settings for the user. Click Next.
-
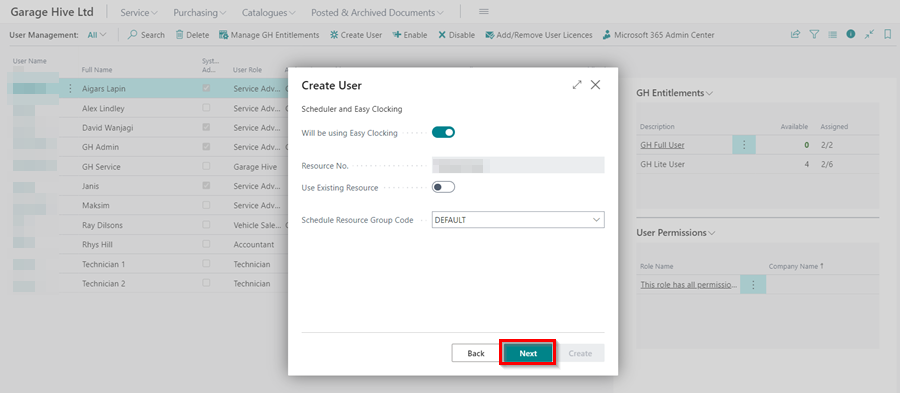
Select Will be using Easy Clocking and add the Schedule Resource Group Code that the technician will be using. The Resource No. is automatically generated. Click Next.
- No salesperson is required on the following pages, click Next.
-
Select Send Welcome Email to the technician. Click Create.
- After creating the technician user, check the schedule to ensure the technician is added.
Enabling and Disabling the User
To enable or disable the user:
- Click on Enable or Disable from the menu bar.
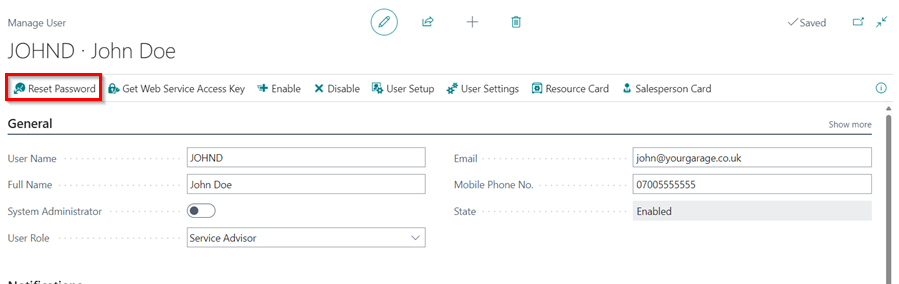
Password Reset for Garage Hive User
To reset a garage hive user’s password:
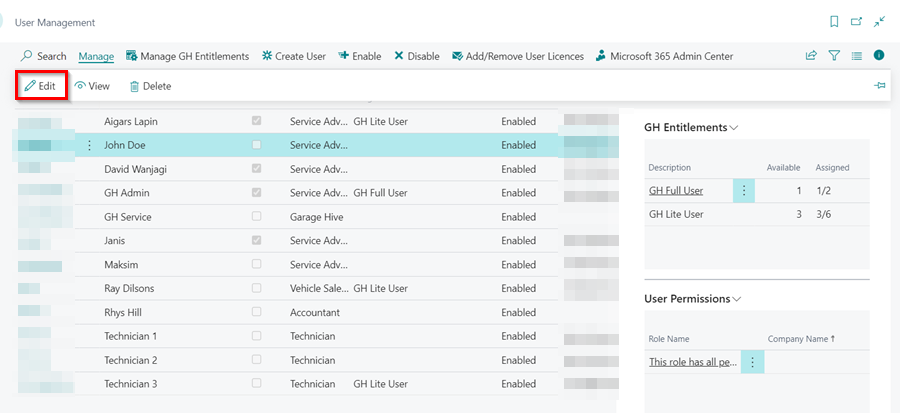
- In the top-right corner, choose the icon, enter User Management, and choose the related link.
-
Select the user you want to reset the password, choose Manage from the menu bar, and click Edit.
-
Click on Reset Password action, and then OK.
-
The user will receive an email with the new password and a link to login. When the user logs in, they will be prompted to change the password to a new password. The Old Password should be the password received via email, and the New Password should be the user coming up with it, and Confirm Password.
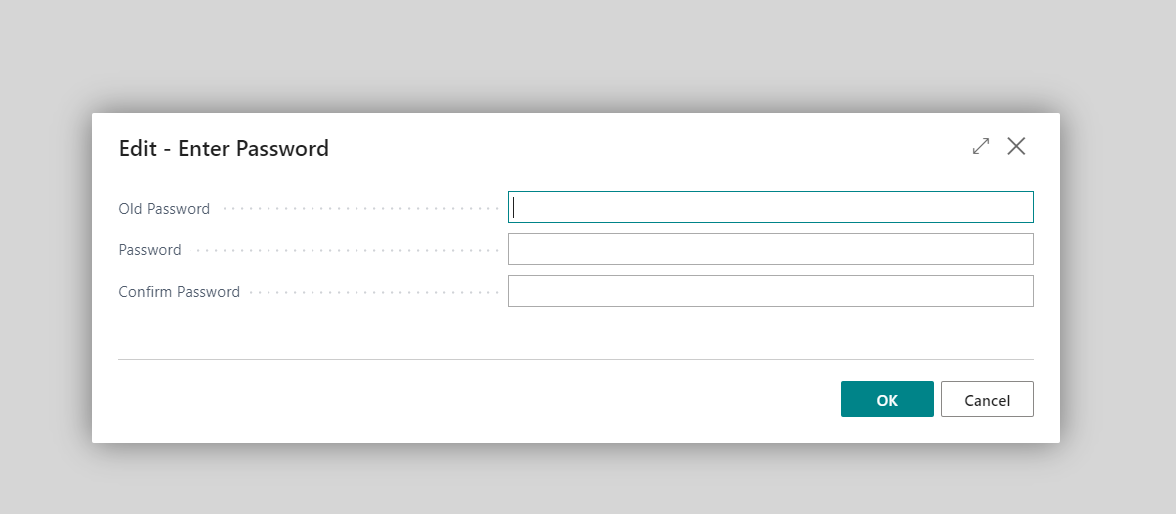
The password entered must be at least 8 characters long and contain at least one uppercase letter, one lowercase letter, one number and one special character. It must not have a sequence of 3 or more ascending, descending or repeating characters.
Enabling Data Permissions for a User
To manage Data Permissions for a user:
-
In the top-right corner, choose the
icon, enter User Management, and choose the related link.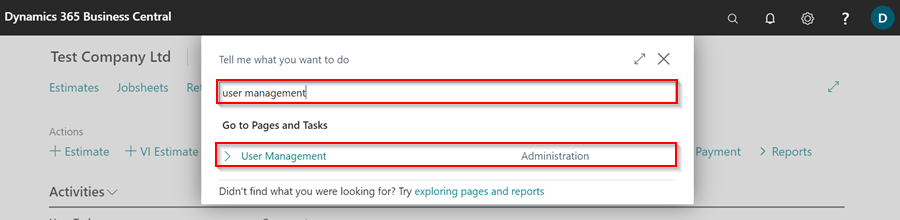
-
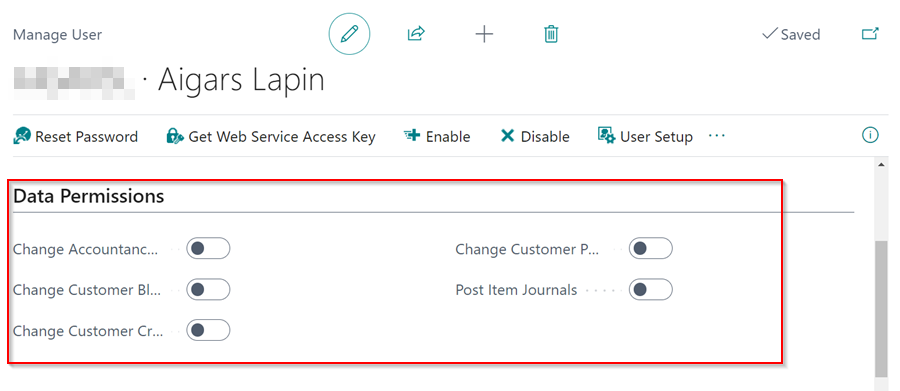
Select the user for which you want to enable data Permissions and scroll down to the Data Permissions FastTab in the user card.
-
You can enable the following Data Permissions for a user:
- Change Accountancy Setup - If a user’s Change Accountancy Setup slider is enabled, they can change:
- General Ledger Setup
- General Posting Setup
- VAT Posting Setup
- Inventory Posting Setup
- Gen. Business Posting Group
- Gen. Product Posting Group
- VAT Business Posting Group
- VAT Product Posting Group
- Customer Posting Group
- Vendor Posting Group
- Inventory Posting Group
-
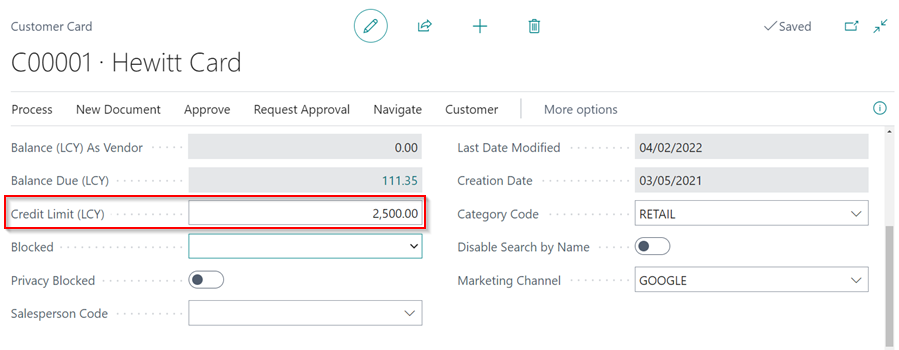
Change Customer Credit Limit - When this is enabled, the user can change the Credit Limit field in the Customer Card, which is located under the General FastTab.
-
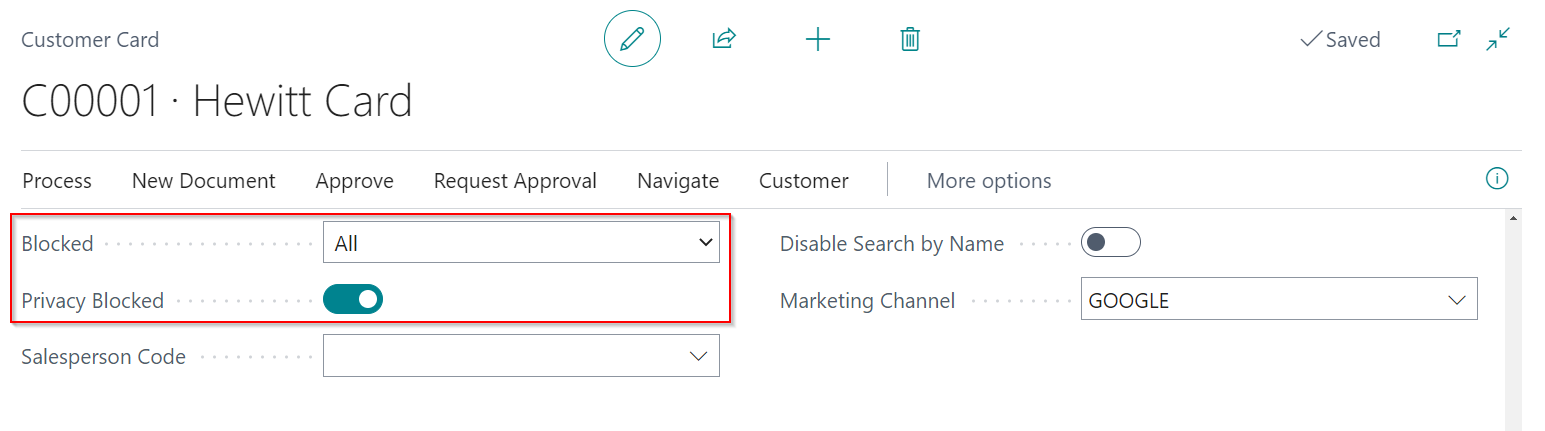
Change Customer Blocked - When this is enabled, the user can block or unblock the Customer Card in the General FastTab of the Customer Card.
-
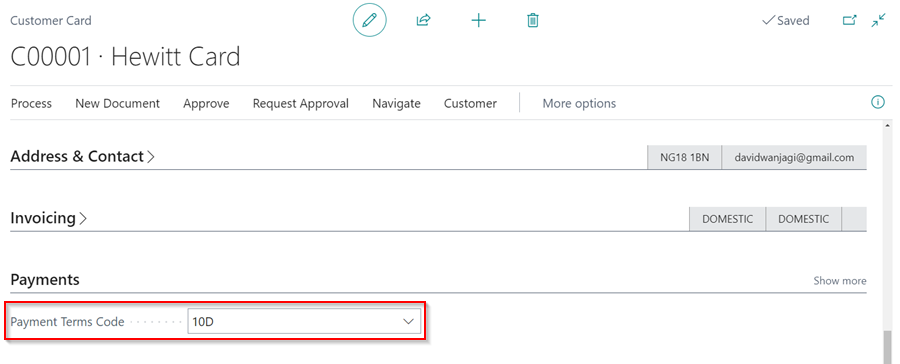
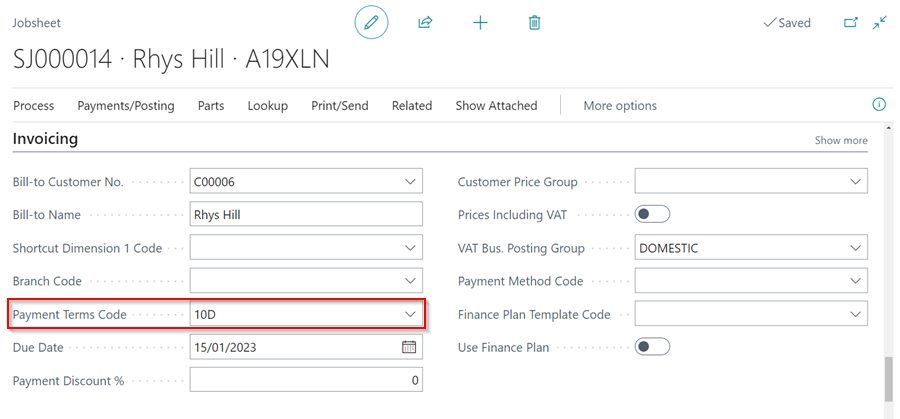
Change Customer Payment Terms - When this is enabled, the user can add or remove the Customer Payment Terms from the Customer Card under the Payments FastTab or from the Jobsheet under the Invoicing FastTab.
or
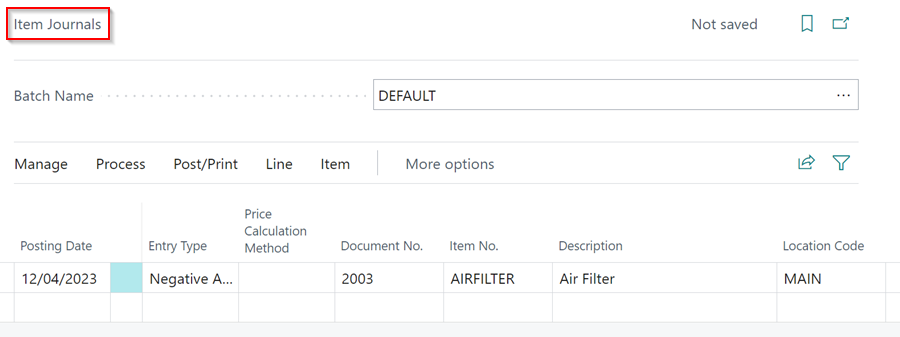
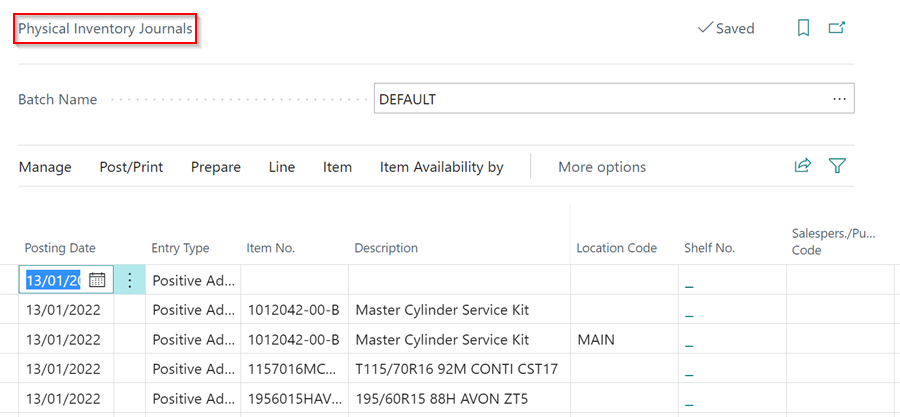
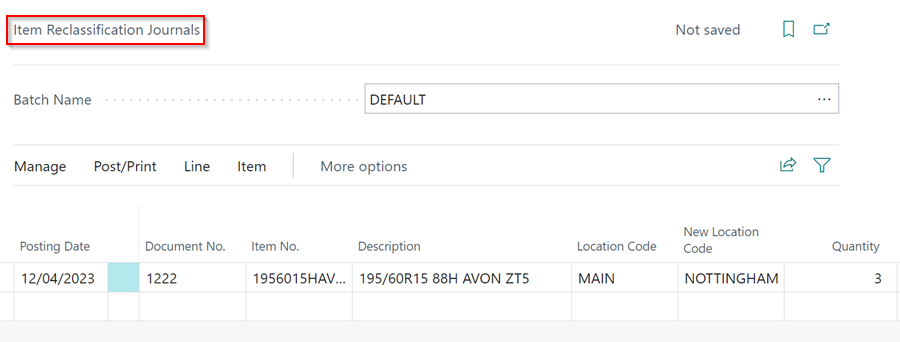
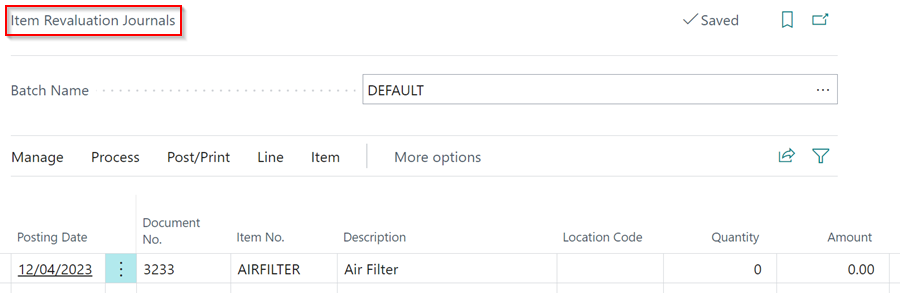
- Post Item Journals - When this is enabled, the user can post the following journals in the system:
-
Item Journals - used to adjust the available quantity of an item in the system.
-
Physical Inventory Journals - Used after a physical stock take to adjust the item quantities in the system to match the physically available inventory.
-
Item Reclassification Journals - Used to change Location Code, or Branch Code for item quantities in the system.
-
Item Revaluation Journals - Used to adjust the value of items in the inventory without affecting their quantity.
-
- Change Accountancy Setup - If a user’s Change Accountancy Setup slider is enabled, they can change:
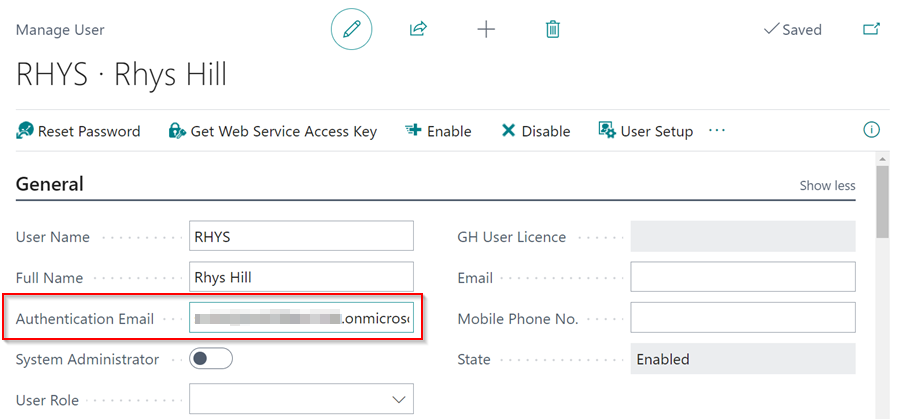
Add Authentication Email with Azure Active Directory (AAD)
To add an authentication email, first create a user in the Azure Active Directory Admin Portal, learn more. After creating the user, add the Email as follows:
-
In the top right corner, choose the
icon, enter User Management, and select the related link.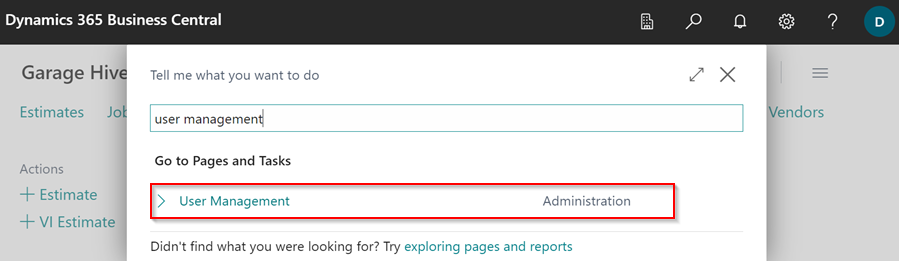
-
Select the user to add the Authentication Email, and enter the email in the Authentication Email field.
How to Filter Out Service Advisor Tiles For a User
If you want a specific user to only see the tiles they have created in the Role Centre, you can enable that in the system for the user; this means that if they only created 4 Jobsheets and there are a total of 12 Jobsheets created, they will only see the 4 Jobsheets they have created in their Role Centre tiles. To enable this for a user:
-
In the top right corner, choose the
icon, enter User Management, and select the related link.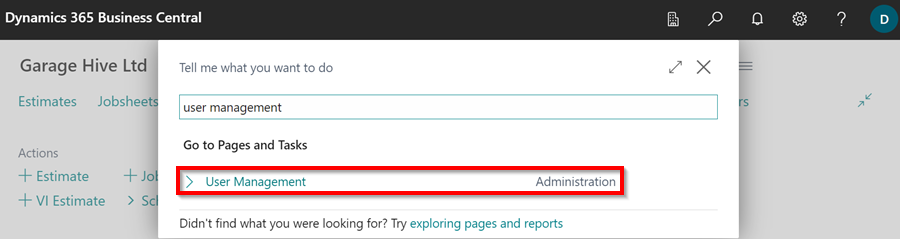
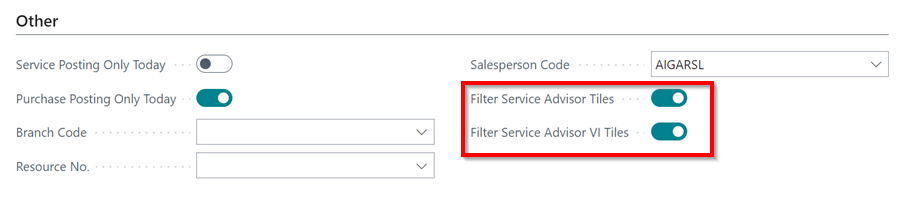
-
Select the user for that you want to enable Service Advisor tile filtering and scroll down to Other FastTab. To filter Service Advisor Tiles (Jobsheets and Estimates), use the Filter Service Advisor Tiles slider; to filter only the Vehicle Inspection (VI) Tiles, use the Filter Service Advisor VI Tiles slider.
See Also
Video: How to manage system users within Garage Hive
How to Create and Edit Users in Azure Active Directory (AAD) and Reset Password
How to Manage GH Entitlements