Module 3 - Processing Jobsheets & Invoicing
Module 3 covers the process of when a customer arrives to drop off their vehicle. You will learn to use features to mark vehicles as on-site, assign parking locations and key numbers, and add expected collection times. Additionally, in module 3, you will learn how to process a Jobsheet from complete to ready for collection, and how to convert a Jobsheet into an invoice.
In the training Modules we’ll cover the following topics:
How to Process a Vehicle Arriving
The following steps outline how to process an arriving vehicle that was pre-booked:
| Step 1 | Open the schedule to access the booking allocation. |
| Step 2 | Right-click on the allocation and select Lookup. |
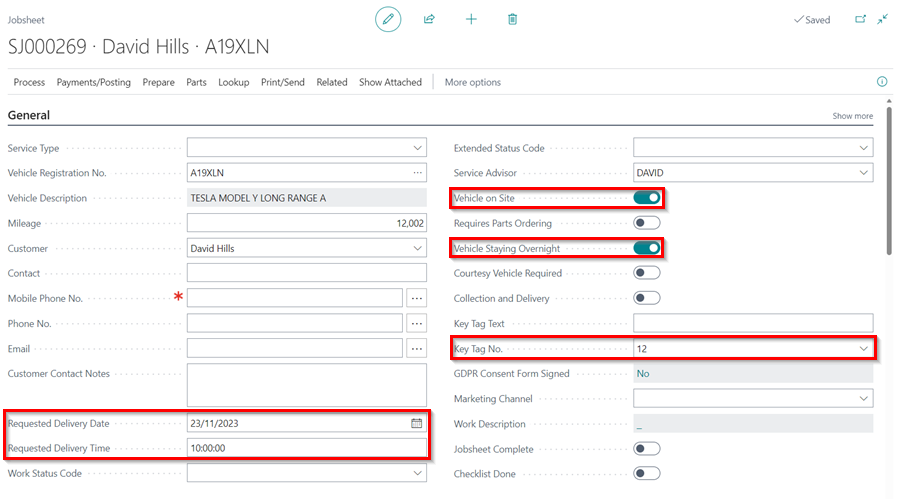
| Step 3 | On the General FastTab, enable the Vehicle on Site slider to confirm that the vehicle has arrived. |
| Step 4 | Allocate the key number for the vehicle in the Key Tag No. field. |
| Step 5 | If the vehicle is staying overnight, enable the Vehicle Staying Overnight slider. |
| Step 6 | If there is a requested time and date to return the vehicle, enter the date in the Requested Delivery Date field and the time in the Requested Delivery Time field. |
| Step 7 | Scroll down to the Comments FastTab and add any customer comments. |
| Step 8 | Ensure that the right items and labour are added in the Lines FastTab. Close the Jobsheet when done. |
| Step 8 | The Job will now be ready to allocate to a technician. |

Learn more: Video: How to Process a Vehicle Arriving
How to Process a Jobsheet to Invoice
The following steps outline how to process a Jobsheet to an Invoice:
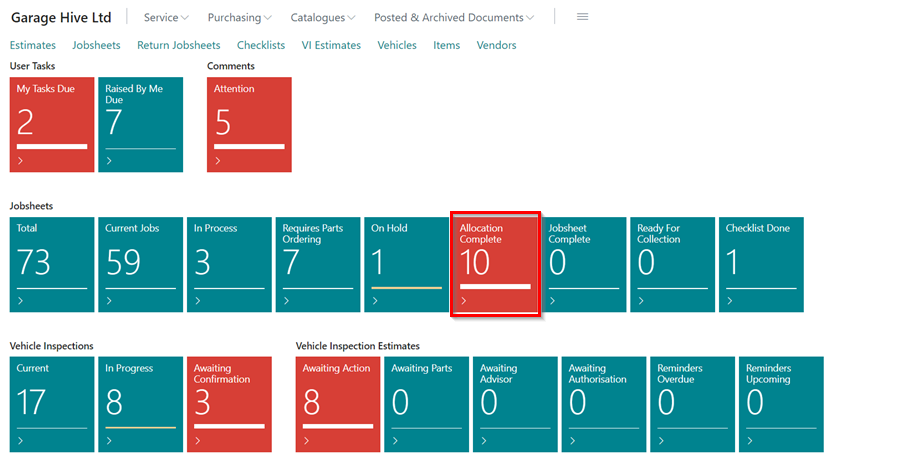
| Step 1 | Once the technician has completed the Job, the Jobsheet will appear in the Allocation Complete tile on the Role Centre and the tile will turn red. In the schedule, it is represented by a purple allocation. |
| Step 2 | Click on the tile and open the completed Jobsheet from the list of Jobsheets. If the technician has added any comments, they will appear in the Comments FastTab. |
| Step 3 | In the Lines FastTab, under the Technician Confirmed column, labour done by the technician and the fitted items will be shown. The technician’s name will appear in the Resources column for the labour. |
| Step 4 | If the Check column in the Lines FastTab has an emoji, it indicates that there is an issue that needs to be addressed. To view the issue, click on the emoji. |
| Step 5 | After addressing all the issues in the Check column, change the work status to Ready for Collection in the Work Status Code field under the General FastTab. This will move the Job to the Jobsheets - Ready for Collection tile. |
| Step 6 | Send an SMS or email to the customer to inform them that the vehicle is ready for collection. To do this, click on the ellipsis (…) in the Mobile Phone No. field, or the Email field under the General FastTab. |
| Step 7 | When the customer arrives to collect the vehicle, open the Jobsheet to take the payment. Select Payments/Posting in the menu bar, followed by Take Payment. |
| Step 8 | After taking the payment, select Payments/Posting again, followed by Post and Print to post the document and print a copy of the document for the customer. |

Learn more: Video: How to Process a Jobsheet to Invoice
Links for Further Learning in Module 3
- Managing Key Numbers
- How to Use Comments
- Taking a Payment and Posting a Jobsheet
- Using the Jobsheet
- Creating a New Jobsheet From Various Places
- Understanding the Jobsheet Line Checker Notifications