Module 4 - Estimates & Vehicle Inspections
In Module 4, the focus is on differentiating between an Estimate and a Vehicle Inspection Estimate. You’ll learn how to create an estimate and convert it into a Jobsheet. Additionally, you will understand how to process a Vehicle Inspection, convert it into an Estimate, and copy the approved work onto the Jobsheet.
In the training Modules we’ll cover the following topics:
How to Create an Estimate
The following steps outline how to create an Estimate in Garage Hive:
| Step 1 | Click on Estimate in the Role Centre, located under the Actions menu. |
| Step 2 | Enter the vehicle registration number in the Vehicle Registration No. field. If the vehicle is already in the system, the customer linked to the vehicle will be added automatically. |
| Step 3 | For new vehicles, the vehicle data will be pulled from autodata. Create a new customer to link with the vehicle. |
| Step 4 | In the Lines FastTab, add labour and items to quote the customer, along with their quantity and selling price. Use the Placeholder Item number for items that don’t have item numbers. |
| Step 5 | Note that, you can also populate the estimate using the Service Packages or Repair Times as demonstrated in Training Module 1 for Jobsheets. |
| Step 6 | After pricing up the estimate, send an SMS or Email to the customer with the total price, or call the customer and discuss the estimate. Change the Estimate Status to Awaiting Authorisation under the General FastTab. |
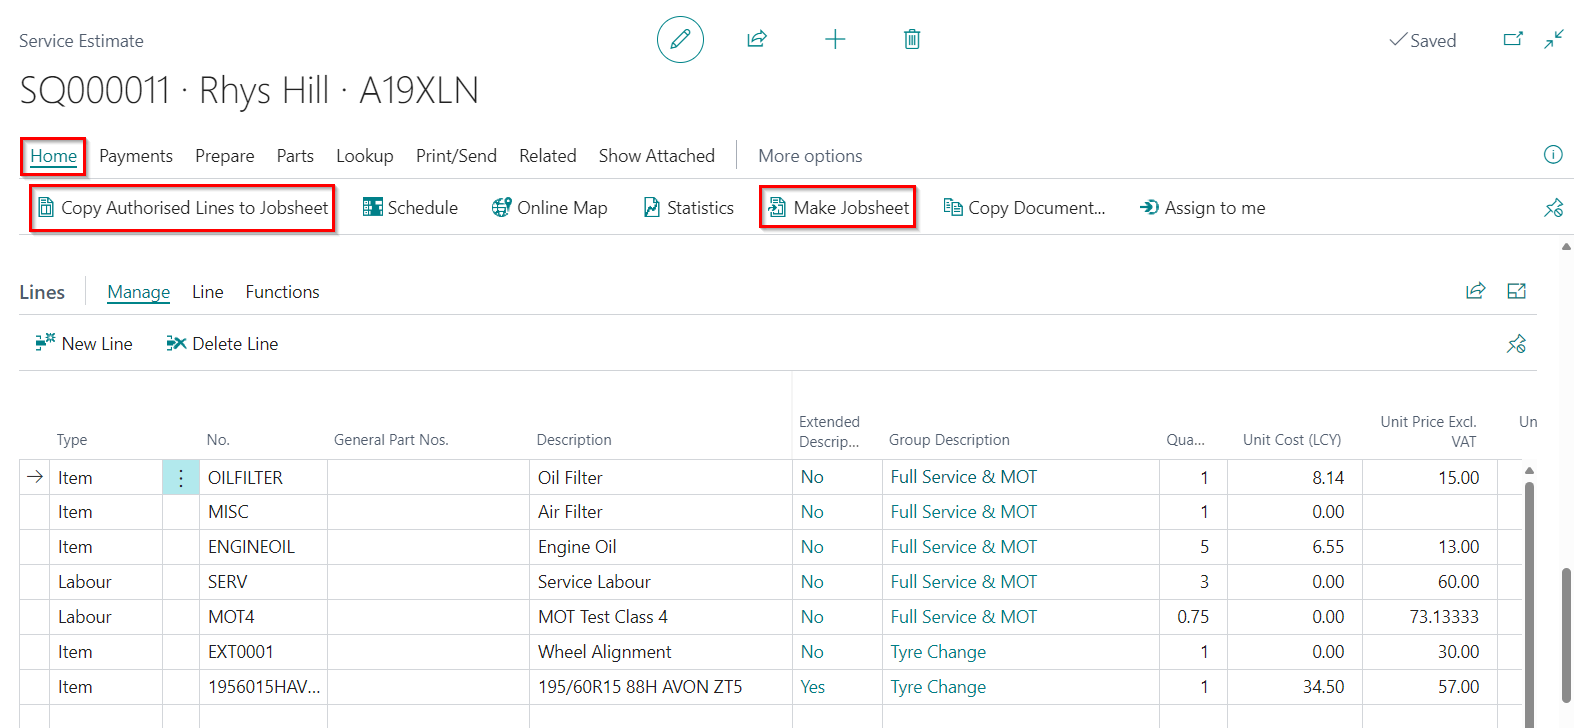
| Step 7 | Once the customer authorises the Estimate, select Home from the menu bar, and then Make Jobsheet if the customer authorised everything. |
| Step 8 | If the customer authorised only some of the lines in the Estimate, tick the authorised lines in the Customer Authorised column under the Lines FastTab. Select Home from the menu bar, followed by Copy Authorised Lines to Jobsheet. |
| Step 8 | After converting the Estimate to a Jobsheet, open the schedule and allocate the created Jobsheet to the date when the customer says they will book their vehicle. |
Learn more: Video: Creating an Estimate
How to Process a Vehicle Inspection
The following steps outline how to process an arriving vehicle that was pre-booked:
| Step 1 | Once a technician completes a Vehicle Inspection, the tile Awaiting Confirmation under Vehicle Inspection turns red. Click on the tile to view the list of completed Vehicle Inspections, and select the one to view. |
| Step 2 | In the Vehicle Inspection, you’ll see colour codes that indicate the extent to which a line requires attention, and at the end of each line, you’ll find comments from the technician. Go through all the lines to confirm what the technician has done. |
| Step 3 | After checking all the lines, select Home from the menu bar, followed by Confirm to confirm the Vehicle Inspection. You will receive a notification asking you if you want to create a VIE. Click YES. |
| Step 4 | Click OK in the next notifications, and the created Vehicle Inspection Estimate will open. |

| Step 5 | In the Vehicle Inspection Estimate, click on Prepare from the menu bar, and select Add Checklist Attention Lines. This will add the advisory and requires urgent attention lines as a group, under the Group Items FastTab. You can edit the group heading in the group lines. |
| Step 6 | Next, add Items and Labour” with their quantity and prices in the Lines FastTab, and link them with the groups created in the Group Items FastTab. Click on the Group Description column to link them with the group. |
| Step 7 | When done adding the Items and Labour, send an SMS or Email to the customer with the total price, or call the customer and discuss the Vehicle Inspection Estimate. Change the VIE Status to Awaiting Authorisation under the General FastTab. |
| Step 8 | Tick the authorised lines in the Customer Authorised column under the Lines FastTab. |
| Step 8 | Once the customer authorises the Vehicle Inspection Estimate, click Home from the menu bar, then Copy Authorised Lines to Jobsheet. Select the Jobsheet to copy the lines to and click OK. |
| Step 8 | Change the VIE Status to “Complete”. |

Learn more: Video: Processing a Vehicle Inspection
Links for Further Learning in Module 4
- Using an Estimate
- Vehicle Inspection Estimate
- How to perform a Vehicle Inspection Checklist as a Technician